There’s something so comforting and fun about a salmon dish that’s layered, creamy, and baked to golden perfection. This Salmon Sushi Bake Recipe blends the flavors of sushi into a cozy casserole that’s perfect for sharing — and trust me, once you make it, you’ll want it in your regular rotation.

Jump to:
Why You'll Love This Recipe
I've been obsessed with this Salmon Sushi Bake Recipe ever since I first tried it at a family gathering. It hits all the right notes — creamy, savory, a little spicy, and just the right amount of umami. It’s an easy way to satisfy sushi cravings without the hassle of rolling.
- Simple yet impressive: It looks like you put in a lot of effort, but it really comes together quickly.
- Flavor-packed layers: From the tangy rice vinegar to the spicy sriracha mayo, each bite is a delicious surprise.
- Great for sharing: Bake it once and have plenty for guests or leftovers.
- Customizable: You can easily swap ingredients or add your favorite sushi toppings.
Ingredients & Why They Work
This recipe’s beauty is in its layers and how each ingredient complements the others, creating a mix of textures and flavors that feel indulgent but are surprisingly straightforward. When shopping, I recommend fresh wild sockeye salmon for the best color and flavor.

- Wild sockeye salmon filet: Offers rich flavor and a firm texture that holds up well when baked.
- Soy sauce: Adds savory depth and umami to the salmon.
- Cooked sticky rice: The glue that holds this bake together, ideally sushi rice for authentic taste and texture.
- Rice vinegar: Brings a subtle tang to balance the creamy and rich layers.
- Nori sheets: Adds that authentic seaweed flavor and a bit of chewiness under the creamy layers.
- Cream cheese: Creates a luscious, creamy layer that contrasts perfectly with the tangy and spicy elements.
- Sriracha mayonnaise: Gives just the right amount of heat and creaminess mixed into the salmon topping.
- Chopped green onions: Freshness and a mild bite that brightens the whole dish.
- Eel sauce: Adds a sweet and savory glaze that beautifully finishes the bake.
- Furikake seasoning: A sprinkle of this makes the top pop with flavor and adds crunch.
- Optional garnishes: I love thin slices of radish, cucumber, jalapeño, avocado, and pickled ginger for contrast and color.
Make It Your Way
One of the best things about this Salmon Sushi Bake Recipe is how easy it is to tweak depending on what you have on hand or your spice preference. I often tweak the sriracha mayo ratio based on the day — sometimes I like it mild and sometimes I want that kick!
- Variation: When I want to cut down on dairy, I swap out cream cheese for avocado slices on top — it keeps it creamy and fresh!
- Seafood swap: Tried it with cooked crab or shrimp, which works well, though nothing beats the salmon flavor in my opinion.
- Make it vegan: Substitute vegan cream cheese and omit the fish, then load it with seasoned tofu or mushrooms.
Step-by-Step: How I Make Salmon Sushi Bake Recipe

Step 1: Bake the Salmon Just Right
Preheat your oven to 400°F, and line a rimmed baking sheet with parchment. Lay out your sockeye salmon and drizzle soy sauce evenly over it — this seasoning is what gives the salmon that umami richness once baked. Slide the salmon in the oven and bake it for 15 minutes. You’re aiming for tender, flaky salmon that’s cooked through but still juicy. Once done, take it out and let it cool while you prepare the rest.
Step 2: Season and Press the Rice
While the salmon is baking, spray a 9×13 baking dish with some nonstick spray. Place the cooked sticky rice in the baking dish, then drizzle your rice vinegar over it. I like to gently toss the rice by hand to coat it all evenly, then press it firmly into the dish to create a nice solid layer. This rice base is what holds everything together and gives that classic sushi texture you want.
Step 3: Build Your Layers
Next, lay the nori sheets over the rice layer — cut them with scissors if needed so they cover the surface nicely. Then spread softened cream cheese evenly on top of the nori. I find using a flat frosting spatula makes this quick and even. The cream cheese layer brings that creamy tang and balances out the saltiness of the soy and nori.
Step 4: Mix and Spread the Salmon Topping
Once the salmon has cooled, peel off and discard the skin. Crumble the salmon into a mixing bowl, then add the sriracha mayonnaise. Mix gently but thoroughly until combined. Spread this spicy salmon mixture over the cream cheese layer as evenly as you can—it’s the star of the show. This spicy-salty layer combined with the creamy cheese underneath? Absolute heaven.
Step 5: Bake Again and Serve
Pop the whole bake back into the oven for about 10 to 15 minutes, just until the salmon layer sets nicely. It will still be tender but hold together well when cut. Let it cool for at least 10 minutes, or refrigerate until chilled for easier slicing. When ready to serve, cut into 12 to 24 squares depending on your crowd. Top with furikake rice seasoning, a drizzle of eel sauce, and a sprinkle of green onions.
For a finishing touch, I often add thin slices of cucumber, radish, jalapeño, or even avocado — these fresh garnishes add crunch and brightness to every bite.
Top Tip
I’ve made this Salmon Sushi Bake Recipe more times than I can count, and a few small things have really made a difference—little tweaks that helped me avoid common pitfalls and get that perfect texture and flavor every time.
- Don’t Overbake: Keep an eye on the salmon and bake just until it flakes easily; overbaking dries it out and dulls the flavor.
- Press the Rice Firmly: Use your hand or the back of a spoon to really compact the rice layer, so it holds together when cutting.
- Softened Cream Cheese Is Key: If the cream cheese is too cold, spreading it gets tricky and uneven — I usually soften it at room temp for at least 30 minutes.
- Use Fresh Green Onions: Adding them right before serving keeps their crunch and freshness, which brightens the whole bake.
How to Serve Salmon Sushi Bake Recipe

Garnishes
I love topping my salmon sushi bake with thin slices of cucumber and radish because they add that lovely crispness to contrast the creamy and tender layers. Jalapeño slices lend a fresh spicy kick, and avocado adds silky richness that’s just dreamy. Pickled ginger on the side adds a little zing and cleanses the palate between bites.
Side Dishes
Pair this bake with a simple seaweed salad, edamame pods sprinkled with sea salt, or a light cucumber sunomono salad. These sides keep things fresh and balanced and don’t compete with the rich flavors of the bake.
Creative Ways to Present
For special occasions, I like serving this Salmon Sushi Bake Recipe in individual mini casserole dishes or even large muffin tins for sushi "cupcakes." It’s playful, fun, and makes portioning a breeze when you have guests. Another idea is to serve it alongside bamboo leaves or on wooden sushi platters for a dinner party vibe.
Make Ahead and Storage
Storing Leftovers
I usually cover leftover salmon sushi bake tightly with plastic wrap or transfer it to an airtight container and refrigerate. It keeps well for up to 3 days. The flavors develop even more after resting, though the texture of the nori softens a bit when refrigerated.
Freezing
I haven’t had the best luck freezing this dish due to the cream cheese layer—it tends to get watery after thawing. I recommend enjoying this bake fresh or within a few days of making it.
Reheating
To reheat leftovers, pop portions in the oven at 350°F for 8-10 minutes until warmed through. This keeps the salmon tender and the top nicely set. Avoid microwaving if possible, as it can make the cream cheese layer separate.
Frequently Asked Questions:
Absolutely! While sockeye salmon offers great flavor and texture, you can substitute with other fatty fish like king salmon, or even cooked shrimp or crab for variation.
Make sure to use sticky sushi rice cooked according to package instructions. Toss it with rice vinegar while still warm, and press firmly into the baking dish for a cohesive base that holds together when cutting.
Yes! You can assemble the bake up to step 5, then refrigerate it before the final bake. When ready, just bake for 10-15 minutes as directed and enjoy fresh, warm.
Thin slices of cucumber, radish, jalapeño, avocado, and pickled ginger are my favorites. They add freshness, crunch, and a lovely contrast to the creamy baked layers.
Final Thoughts
This Salmon Sushi Bake Recipe remains one of my go-to dishes for gatherings or when I want something a little special but fuss-free. It’s warm, comforting, and offers all those flavors you love in sushi, just layered and baked with a creamy twist. You’re going to impress without spending hours, and your friends (or family) will be asking for seconds—so get ready to make this one soon!
Print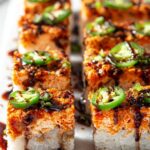
Salmon Sushi Bake Recipe
- Prep Time: 30 minutes
- Cook Time: 25 minutes
- Total Time: 55 minutes
- Yield: 12 pieces 1x
- Category: Main Course
- Method: Baking
- Cuisine: Japanese-inspired
Description
This Salmon Sushi Bake is a delicious and easy-to-make dish that layers tender sticky rice, nori sheets, cream cheese, and perfectly baked wild sockeye salmon mixed with spicy sriracha mayo. Baked to set all the flavors together, it’s finished with furikake seasoning, eel sauce, and fresh garnishes like radish, cucumber, jalapeño, and avocado, perfect for a crowd-pleasing appetizer or main course.
Ingredients
Salmon
- 1 ½ - 2 pounds wild sockeye salmon filet
- 2 tablespoon soy sauce
Rice Layer
- 32 ounces ready-made cooked sticky rice (or 3 cups dried sushi rice, cooked according to package)
- 2 tablespoons rice vinegar
- 2-3 nori sheets
Salmon Mixture
- 16 ounces cream cheese (softened to room temperature)
- ½ cup sriracha mayonnaise
- ½ cup chopped green onions
- 3 tablespoons eel sauce (or oyster sauce)
- 1-2 tablespoons furikake rice seasoning
Optional Garnishes
- Thinly sliced radish
- Thinly sliced cucumbers
- Thinly sliced jalapeño
- Thinly sliced avocado
- Pickled ginger
Instructions
- Preheat and prepare salmon: Preheat your oven to 400°F. Line a large rimmed baking sheet with parchment paper. Place the wild sockeye salmon filet on the parchment and drizzle 2 tablespoons of soy sauce over the top.
- Bake salmon: Bake the salmon for 15 minutes until cooked through, then remove from oven and let cool slightly.
- Prepare rice layer: While salmon cooks, spray a 9 x 13-inch baking dish with nonstick cooking spray. Place the cooked sticky rice in the dish, drizzle with 2 tablespoons rice vinegar, and toss by hand to combine. Press the rice firmly into an even layer in the bottom of the dish.
- Add nori and cream cheese: Lay the nori sheets evenly over the rice, trimming with scissors if needed to fit the surface. Spread softened cream cheese evenly over the nori sheets using a flat frosting spatula.
- Mix salmon and sriracha mayo: Once the salmon has cooled, remove and discard the skin, then crumble the salmon into a mixing bowl. Add the sriracha mayonnaise and mix well to combine.
- Spread salmon mixture: Spread the salmon and sriracha mixture evenly over the cream cheese layer in the baking dish.
- Bake the sushi bake: Return the baking dish to the oven and bake for 10 to 15 minutes until the salmon layer is well set and slightly firm.
- Cool and cut: Remove the sushi bake from the oven and let it cool for at least 10 minutes before cutting. Alternatively, refrigerate until cold and then cut into 12 to 24 pieces.
- Garnish and serve: Sprinkle the top of each piece with furikake rice seasoning, drizzle with eel sauce, and sprinkle with chopped green onions. Add optional fresh garnishes such as thin cucumber, radish, jalapeño, avocado slices, or pickled ginger for added texture and flavor.
Notes
- This sushi bake is a non-traditional, crowd-pleasing twist on classic sushi rolls, making it perfect for parties and gatherings.
- Use wild sockeye salmon for rich flavor; however, other salmon varieties like king or coho can work as substitutions.
- If you prefer less heat, reduce the amount of sriracha mayo or omit jalapeño garnish.
- Sticky sushi rice can be made in advance and refrigerated before assembling.
- Feel free to customize garnishes according to your taste for freshness and crunch.
- For a gluten-free option, ensure soy sauce and eel sauce are gluten-free varieties.
Nutrition
- Serving Size: 1 piece
- Calories: 325 kcal
- Sugar: 2 g
- Sodium: 511 mg
- Fat: 17 g
- Saturated Fat: 5 g
- Unsaturated Fat: 10 g
- Trans Fat: 0.02 g
- Carbohydrates: 26 g
- Fiber: 0.2 g
- Protein: 17 g
- Cholesterol: 56 mg

Leave a Reply