There’s something utterly irresistible about a dessert that brings together the luxurious creaminess of cheesecake with the bold, eye-catching flair of red velvet. This Red Velvet Chocolate Cheesecake Recipe is my go-to when I want to wow guests without turning on the oven—it’s rich but light, and oh-so-chocolatey with a striking red hue that screams celebration.

Jump to:
Why You'll Love This Recipe
Honestly, every time I make this no-bake red velvet cheesecake, it feels like a special occasion, even if it’s just a regular Tuesday. The mix of creamy chocolate and vibrant red velvet, all resting on a crunchy Oreo crust? It never disappoints.
- Stunning Visual Impact: The deep red color paired with chocolate makes it a centerpiece-ready dessert.
- No-Bake Ease: No oven? No problem. This cheesecake sets beautifully in the fridge.
- Decadent Yet Light: It’s rich thanks to the dark chocolate but surprisingly airy thanks to whipped cream and gelatin.
- Crispy Oreo Crust: Adds a crunchy, chocolatey base that complements the creamy filling perfectly.
Ingredients & Why They Work
Before you start, here’s a quick rundown of the key players in this recipe. Choosing the right ingredients makes all the difference, so I always recommend using good-quality cream cheese and dark chocolate, and don’t skip the red food coloring—it’s what creates that signature red velvet vibe.

- Oreo cookies: Crushing these creates a rich, chocolatey base that’s firm yet crumbly enough to bite through.
- Unsalted butter: Melting it blends with the cookie crumbs to hold the crust together firmly.
- Unflavoured gelatine powder: This is key to giving the cheesecake its perfect, sliceable texture without baking.
- Water: To bloom the gelatine and help it dissolve smoothly.
- Heavy/thickened cream: Used both in the filling and for whipping the topping, it adds amazing creaminess and lightness.
- Cream cheese: The foundation of the cheesecake filling—softened to room temperature for a super smooth texture.
- Caster sugar / superfine sugar: Sweetens the cheesecake delicately without graininess.
- Vanilla extract: Enhances all the flavors with a warm, aromatic note.
- 70% dark chocolate: For that deep, bittersweet chocolate flavor that balances the sweet and creamy elements.
- Red food colouring: Essential for that vivid red velvet color — gel type works great, especially if you’re in the UK.
- Shaved or grated dark chocolate (optional): Used to stabilize the whipped cream topping and add a subtle chocolate crunch.
Make It Your Way
One of the best things about this Red Velvet Chocolate Cheesecake Recipe is how adaptable it is! Whether you're tailoring it for a special occasion or just mixing things up for fun, there are plenty of ways to make this stunning dessert your own.
- Variation: For a seasonal twist, try folding in fresh raspberries or cherries into the cheesecake filling before setting it. The tart fruit perfectly balances the rich chocolate and creamy texture. I remember making this variation last winter for a holiday party — the burst of fruitiness made it an instant hit!
- Dietary tweak: If you want to make it gluten-free, simply swap the Oreo cookies for a gluten-free chocolate cookie crumb. It maintains that crumbly, chocolatey crust we all love without compromising the flavor.
- Make it extra festive: Add a hint of cinnamon or a splash of bourbon to the filling. This adds depth and a warm note that’s perfect for cozy gatherings.
- Topping ideas: Instead of plain whipped cream, try swirling in a little cream cheese or mascarpone to the topping for added decadence. Or pipe pretty rosettes and sprinkle with edible gold dust for a wow factor.
Step-by-Step: How I Make Red Velvet Chocolate Cheesecake Recipe

Step 1: Prep the Pan for Easy Cheesecake Removal
Begin by flipping the base of your 20cm (8") springform pan upside down. This clever trick makes it easier to remove the cheesecake without the pan lip getting in the way. Lightly butter the pan base, then press a square sheet of baking paper onto it. Attach the pan sides, allowing the excess paper to hang over for easy removal later. Finally, butter and line the sides with baking paper too. This step ensures your cheesecake will come out flawlessly smooth and ready to impress.
Step 2: Make the Oreo Cookie Crust
Crush 200g of Oreo cookies finely—using a food processor makes this effortless—or place them in a ziplock bag and bash with a rolling pin. Combine the crumbs with 60g of melted unsalted butter, mixing until fully incorporated. Press this chocolatey mixture firmly into the bottom of your prepared pan, creating a compact and even crust. Pop it into the fridge to chill while you prepare the luscious filling.
Step 3: Bloom the Gelatin
Sprinkle 2 teaspoons of unflavored gelatin powder over 2 tablespoons of water. Let it sit for about 5 minutes until the gelatin absorbs the water and firms up slightly. This step is essential for helping your no-bake cheesecake set perfectly without any baking.
Step 4: Melt the Dark Chocolate
Melt 150g of 70% dark chocolate gently over a double boiler or in short bursts in the microwave. Stir frequently as it melts to ensure a smooth, glossy finish. Let the chocolate cool a bit—warm, but not hot—to prevent it from seizing when mixed in.
Step 5: Whip the Cream for the Filling
Grab 1 cup of cold heavy cream right from the fridge and whip it until stiff peaks form. This gives your cheesecake a light, airy texture that balances the richness beautifully. Set the whipped cream aside while you prepare the cream cheese mixture.
Step 6: Blend the Cream Cheese Mixture
In a large bowl, beat 500g of softened cream cheese with ¾ cup of caster sugar and 1 teaspoon of vanilla extract until smooth and creamy. Then, mix in your cooled melted dark chocolate until fully combined. This silky, chocolatey base is what makes this cheesecake so deliciously decadent.
Step 7: Incorporate the Gelatin
Gently warm the bloomed gelatin until it becomes liquid but not hot—overheating can break down its setting power. Slowly pour the gelatin into your cream cheese and chocolate mixture, stirring constantly to blend it evenly. This guarantees your cheesecake will set nicely in the fridge.
Step 8: Add the Signature Red
Mix in 6 teaspoons of red food colouring thoroughly until the batter turns a vibrant, uniform red. This is the key to capturing that classic red velvet charm. (For UK cooks, gel-type food colouring tends to give the brightest hue.)
Step 9: Fold in the Whipped Cream
Carefully fold the whipped cream into the red velvet cream cheese mixture using gentle motions to keep the airiness intact. This step creates the light, velvety texture that makes this cheesecake melt in your mouth.
Step 10: Assemble and Chill
Pour the luscious red velvet filling over the chilled Oreo crust, smoothing the top with a spatula. Pop the whole cheesecake into the refrigerator and let it set for at least 4 hours. Patience here is worth it — the filling will firm up to that perfect creamy yet sliceable consistency.
Step 11: Whip the Cream Topping
Whip 1¼ cups of chilled heavy cream with 3 tablespoons caster sugar and 1 teaspoon vanilla extract until you get stiff peaks. For extra stability and a touch of chocolate flavor, gently fold in 2 tablespoons of shaved or grated dark chocolate. This topping will hold beautifully on your cheesecake.
Step 12: Decorate and Chill Again
Spread or pipe your whipped cream topping evenly over the set cheesecake. Garnish with extra grated dark chocolate if you want to add a little extra flair. Finally, chill the cheesecake for another 30 minutes so the topping firms up just right before serving.
Top Tip
Mastering the Red Velvet Chocolate Cheesecake Recipe is all about attention to detail and a few handy tricks that ensure your dessert turns out as stunning as it tastes. These tips stem from my own kitchen adventures, where trial and error shaped the perfect no-bake cheesecake experience.
- Bloom Your Gelatin Properly: I learned that letting the gelatin bloom fully in water before warming gently prevents lumps and ensures a smooth, silky cheesecake filling every time.
- Softened Cream Cheese is Key: Taking the time to let your cream cheese sit at room temperature means it mixes into a creamy, lump-free base that's essential for that luscious texture.
- Folding Technique Matters: When folding the whipped cream into the cream cheese mixture, I always do it gently and gradually. This helps retain the airiness, giving the cheesecake its light yet rich character.
- Use a Springform Pan with Baking Paper Lining: This trick saves you from struggling to release the cheesecake later. Flipping the base upside down and lining everything with parchment paper creates perfectly clean edges and an easy removal.
How to Serve Red Velvet Chocolate Cheesecake Recipe

Garnishes
To dress up your Red Velvet Chocolate Cheesecake, I love adding a generous spread or delicate piping of whipped cream on top. Sprinkle shaved or grated dark chocolate details for both texture and elegant contrast. Fresh berries like raspberries or strawberries also make vibrant, tangy accents that complement the richness beautifully.
Side Dishes
This cheesecake shines on its own, but pairing it with a light fruit salad or a simple espresso makes for a perfectly balanced dessert course. A scoop of vanilla bean ice cream or a drizzle of berry coulis adds an extra touch of indulgence without overpowering the deep chocolate and red velvet flavors.
Make Ahead and Storage
Storing Leftovers
Keep your cheesecake well covered in the refrigerator, ideally with cling film or stored inside an airtight container, for up to 4 days. This protects its delicate texture and keeps the flavors fresh and vibrant.
Freezing
You can freeze the cheesecake if you want to save leftovers longer. Wrap it tightly in plastic wrap and then in foil to avoid freezer burn. Freeze for up to 1 month. When ready to enjoy, thaw slowly overnight in the refrigerator to preserve the creamy texture.
Reheating
This no-bake cheesecake is best enjoyed chilled. If it’s been frozen, just let it thaw completely in the fridge. Avoid microwaving or warming, as it may ruin the silky texture and whipped cream topping.
Frequently Asked Questions:
Absolutely! While Oreo cookies give a rich chocolatey base, alternatives like chocolate graham crackers or chocolate digestives can work well too. Just make sure to crush them finely and mix with melted butter for a firm crust.
The red food coloring is essential to achieve that classic, vibrant red velvet appearance. For the best intensity, I recommend a gel-type color, especially if you’re in the UK, since it tends to saturate the mixture beautifully without thinning it.
Gelatin is key to setting this no-bake cheesecake, giving it structure and a smooth finish. Without gelatin, the filling may be too soft and won't hold shape. If you prefer a vegetarian alternative, consider agar-agar, but note it requires a different preparation technique.
The two biggest factors are using room temperature softened cream cheese and folding in whipped cream gently. Also, melting your chocolate carefully and incorporating the gelatin evenly helps maintain a silky smooth texture.
Final Thoughts
Making this Red Velvet Chocolate Cheesecake Recipe is a true joy, especially when you see the wow-worthy red velvet hue paired with the rich, chocolate-infused creaminess. It’s the kind of dessert that feels special yet simple to prepare—perfect for celebrations or a cozy treat that impresses family and friends. I hope you enjoy every luscious bite as much as I do!
Print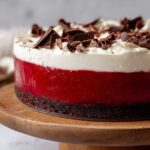
Red Velvet Chocolate Cheesecake Recipe
- Prep Time: 30 minutes
- Chilling Time: 4 hours
- Cook Time: 0 minutes
- Total Time: 4 hours 30 minutes
- Yield: 12 servings 1x
- Category: Dessert
- Method: No-Cook
- Cuisine: American
- Diet: Vegetarian
Description
A no-bake red velvet cheesecake that combines the bold, striking color of red velvet cake with the creamy decadence of cheesecake. This rich yet light dessert features a chocolatey, velvety filling with an Oreo cookie crust, perfect for special occasions and impressing guests.
Ingredients
Crust
- 200g Oreo cookies (1.5 standard packs)
- 60g unsalted butter, melted
Gelatin Mixture
- 2 tsp unflavoured gelatine powder
- 2 tbsp water
Cheesecake Filling
- 1 cup heavy/thickened cream, fridge cold
- 500g cream cheese, softened (block form)
- ¾ cup caster sugar / superfine sugar
- 1 tsp vanilla extract
- 150g 70% dark chocolate
- 6 tsp red food colouring
Whipped Cream Topping
- 1 ¼ cups heavy/thickened cream, fridge cold (for whipping)
- 3 tbsp caster sugar / superfine sugar
- 1 tsp vanilla extract
- Optional: 2 tablespoon shaved or grated dark chocolate (for stabilizing and garnish)
Instructions
- Prepare the Pan: Flip the base of a 20cm / 8" springform pan upside down to make removal easier. Lightly butter the pan base and press a square sheet of baking paper onto it. Attach the pan sides and let excess paper hang over the edges. Butter and line the sides with baking paper as well.
- Make the Crust: Crush the Oreo cookies finely and mix thoroughly with melted unsalted butter. Press this mixture evenly into the bottom of the prepared pan to form a firm crust. Refrigerate while preparing the filling.
- Bloom Gelatin: Sprinkle gelatine powder over 2 tablespoons of water and allow it to bloom for 5 minutes until absorbed and slightly firm.
- Melt Chocolate: Gently melt the 70% dark chocolate over a double boiler or in short bursts in the microwave, stirring until smooth. Let it cool slightly.
- Whip Cream for Filling: Whip 1 cup of cold heavy cream until stiff peaks form. Set aside.
- Prepare Cream Cheese Mixture: In a large bowl, beat softened cream cheese with caster sugar and vanilla extract until smooth and creamy. Add the melted chocolate and mix well.
- Add Gelatin: Warm the bloomed gelatin gently until liquid but not hot, then slowly mix it into the cream cheese and chocolate mixture to ensure it's fully incorporated.
- Add Food Coloring: Mix in 6 teaspoons of red food colouring thoroughly until the mixture is evenly colored a vibrant red.
- Fold in Whipped Cream: Carefully fold the whipped cream into the cream cheese mixture, retaining as much airiness as possible for a light texture.
- Assemble Cheesecake: Pour the filling over the chilled Oreo crust in the springform pan, smoothing the top with a spatula. Refrigerate for at least 4 hours or until set.
- Whip Topping Cream: Whip 1 ¼ cups cold heavy cream with 3 tablespoons caster sugar and 1 teaspoon vanilla extract until stiff peaks form. Optionally, fold in 2 tablespoons grated dark chocolate to stabilize and add texture.
- Decorate Cheesecake: Spread or pipe the whipped cream topping evenly over the set cheesecake. Garnish with additional shaved or grated dark chocolate if desired.
- Chill Before Serving: Refrigerate cheesecake for an additional 30 minutes to set the topping before slicing and serving.
Notes
- This cheesecake is a no-bake dessert, which makes it easy to prepare without an oven.
- Use high-quality 70% dark chocolate for the best flavor balance.
- Red food coloring is crucial for achieving the signature red velvet look; UK readers might prefer gel-type for vividness.
- Softened cream cheese should be at room temperature for easy mixing and smooth texture.
- To ensure the gelatin dissolves completely, warm it gently but do not overheat.
- The whipped cream topping can be stabilized with grated chocolate or a small amount of gelatin if it needs to hold shape longer.
- Chilling times are important to allow the cheesecake to set properly and develop its texture.
- Use a springform pan with baking paper for easy removal and clean edges.
Nutrition
- Serving Size: 1 serving
- Calories: 540 kcal
- Sugar: 29 g
- Sodium: 210 mg
- Fat: 43 g
- Saturated Fat: 25 g
- Unsaturated Fat: 14 g
- Trans Fat: 0.2 g
- Carbohydrates: 37 g
- Fiber: 2 g
- Protein: 6 g
- Cholesterol: 103 mg


Leave a Reply