If you’re craving a dessert that’s as stunning as it is indulgent, then this No Bake Chocolate Pistachio Cheesecake Recipe is exactly what your kitchen—and your taste buds—need. Rich chocolate, crunchy pistachios, and silky creaminess come together effortlessly, without turning on your oven.

Jump to:
- Why You'll Love This Recipe
- Ingredients & Why They Work
- Make It Your Way
- Step-by-Step: How I Make No Bake Chocolate Pistachio Cheesecake Recipe
- Top Tip
- How to Serve No Bake Chocolate Pistachio Cheesecake Recipe
- Make Ahead and Storage
- Frequently Asked Questions:
- No Bake Chocolate Pistachio Cheesecake Recipe
Why You'll Love This Recipe
I still remember the first time I made this cheesecake—it felt fancy yet totally doable, and every bite was a dreamy mix of smooth chocolate and pistachio crunch. It’s my go-to for impressing friends when I want something luxurious but fuss-free.
- No baking required: Perfect for those warm days or when you just want to skip the oven heat.
- Layered texture magic: Crunchy pistachio knafeh and cookie crust add delightful contrast to creamy chocolate cheesecake.
- Decadent flavor combo: Rich dark chocolate and earthy pistachio make every slice irresistible.
- Great for entertaining: Serves 12, so it’s ideal for sharing at parties or family dinners.
Ingredients & Why They Work
Picking quality ingredients really makes a difference here—think fresh pistachio cream and good dark chocolate to boost flavor depth. Let me walk you through what each component brings to the party.

- Chocolate creme cookies: These form the rich, chocolaty crust that holds the cheesecake together and adds a nice snap.
- Unsalted butter: Melts into the cookie crumbs and kataifi to create that perfect crisp and richness.
- Shredded kataifi: This shredded pastry creates the signature crunchy pistachio knafeh layer—don’t skip it!
- Pistachio cream: Infuses the cheesecake and knafeh with a luscious, nutty flavor that’s just divine.
- Pinch of salt: Enhances the overall flavors, balancing sweetness and bringing out nuttiness.
- Heavy cream: Whipped into the filling, it adds lightness and creaminess for that melt-in-your-mouth effect.
- Dark or semi-sweet chocolate: Provides the deep chocolate notes that make this cheesecake so decadently rich.
- Cream cheese: The heart of the cheesecake—make sure it’s room temperature for the smoothest texture.
- Granulated sugar: Sweetens the filling just enough without overpowering the chocolate and pistachio.
- Vanilla extract: Adds subtle warmth and depth to the flavor profile.
Make It Your Way
The beauty of this No Bake Chocolate Pistachio Cheesecake Recipe is how easily it adapts to your tastes and pantry. Feel free to tweak the layers or toppings to match your mood or what you have on hand — the base flavors are a fantastic canvas for creativity.
- Variation: For a nut-free version, try swapping the pistachio cream layer and topping with a fragrant orange blossom cream or rosewater whipped cream. I’ve made this for friends with nut allergies, and it still turned out decadent and flavorful!
- Seasonal twist: Add a handful of fresh berries atop the cheesecake before serving for a burst of freshness. The tartness pairs beautifully with the rich chocolate and crunchy pistachio knafeh.
- Dairy-free alternative: Use a plant-based cream cheese and coconut-based heavy cream substitutes. The cheesecake sets a bit softer but remains delightfully creamy and luscious.
Step-by-Step: How I Make No Bake Chocolate Pistachio Cheesecake Recipe

Step 1: Craft the Perfect Chocolate Cookie Crust
Start by crushing 25 chocolate creme cookies into fine crumbs—using a food processor works like a charm, but a rolling pin and a sealed plastic bag do just fine too. Mix these crumbs thoroughly with 5 tablespoons of melted unsalted butter to create an even, moist texture. Press this crust firmly into the bottom of your springform pan to form an even layer. Pop it in the fridge – this chill time is essential for a sturdy base that won’t crumble later.
Step 2: Sauté the Pistachio Knafeh Layer to Golden Crunchiness
In a skillet, melt 4 tablespoons of butter over medium heat. Add 3 cups of shredded kataifi and sauté, stirring frequently, until the strands turn golden and crispy — this should take around 5 to 7 minutes. Watch it closely to avoid any burning but aim for that perfect crunch. Remove from heat, then stir in a pinch of salt and between ½ to ⅔ cup of pistachio cream, tossing gently to coat every crispy thread. Spread the knafeh evenly over the chilled cookie crust and return the pan to the fridge to keep it set while you prepare the filling.
Step 3: Melt and Cool the Chocolate for a Silky Finish
Chop 200 grams of dark or semi-sweet chocolate into small pieces. Gently melt the chocolate using a double boiler or microwave in short bursts, stirring often to prevent scorching. Once smooth, let it cool slightly—but don’t let it harden. This warm melted chocolate will blend beautifully with the creamy filling.
Step 4: Whip the Cheesecake Filling to Creamy Bliss
In a large bowl, beat 24 ounces (680g) of room temperature cream cheese together with ½ cup (100g) granulated sugar, 1 teaspoon vanilla extract, and ½ teaspoon salt until smooth and fluffy. In a separate bowl, whip 1 cup (240g) of heavy cream to soft peaks — this gives the filling its light texture. Gently fold the whipped cream into the cream cheese mix, then carefully fold in the melted chocolate until you have a luscious, even mixture.
Step 5: Infuse the Cheesecake with Pistachio Cream
Stir in ½ to ⅔ cup (140g to 185g) of pistachio cream into your chocolate cheesecake batter. This adds a fragrant, nutty richness that beautifully complements the chocolate and knafeh layers. Take a moment to savor this luscious mixture—your patience will pay off!
Step 6: Whip Heavy Cream to Stiff Peaks for Fluffy Texture
Using a cold bowl and chilled beaters, whip 1 cup (240g) of heavy whipping cream until it holds stiff peaks. This extra volume will lighten the cheesecake filling to melt-in-your-mouth fluffiness. Fold this whipped cream gently into the cheesecake mixture, careful not to deflate it.
Step 7: Assemble and Chill the Luxurious Layers
Pour the creamy chocolate pistachio cheesecake filling on top of the pistachio knafeh layer in your springform pan. Smooth the top with an offset spatula for a polished look. Cover the pan and refrigerate for at least 6 hours, preferably overnight, allowing the cheesecake to set completely and the flavors to meld beautifully.
Step 8: Serve with Elegance and Enjoy
Before serving, run a warm, dry knife around the edges of the cheesecake to loosen it from the pan. Slice carefully and serve chilled. For a beautiful finishing touch, sprinkle with extra chopped pistachios or chocolate shavings to elevate presentation and add a little crunch.
Top Tip
Getting the perfect texture and flavor balance in your No Bake Chocolate Pistachio Cheesecake Recipe can be so rewarding. Here are some tips to help you nail it every time!
- Chilling Matters: I always chill the crust and knafeh layer separately before adding the filling. It helps everything set up perfectly and keeps those layers distinct and crunchy.
- Whip Cream with Care: Folding in the whipped cream gently is key. I learned that rushing this step deflates the mixture and results in a denser cheesecake, not the light, fluffy texture we want.
- Kataifi Crispness: Toast the shredded kataifi over medium heat, stirring constantly. I've found that keeping a close eye on it prevents burning and gets that lovely golden crunch essential for the pistachio knafeh layer.
- Room Temperature Cream Cheese: Avoid lumps by letting your cream cheese sit out before mixing. This small step saves you from frustration and gives a silky smooth filling.
How to Serve No Bake Chocolate Pistachio Cheesecake Recipe

Garnishes
Enhance the presentation and flavor with a sprinkle of chopped pistachios or chocolate shavings for that extra visual appeal. A dollop of pistachio cream or whipped cream on top adds a luscious finish that guests will adore.
Side Dishes
Serve this cheesecake alongside fresh berries or a simple mixed fruit salad to add brightness and balance the richness. A cup of strong Arabic coffee or mint tea pairs wonderfully for a decadent dessert experience.
Make Ahead and Storage
Storing Leftovers
Store your leftover cheesecake covered tightly in the refrigerator. It keeps beautifully fresh for up to 4 days, maintaining that creamy texture and crunchy pistachio layer.
Freezing
You can freeze slices wrapped in plastic wrap and placed in an airtight container for up to 1 month. Thaw in the refrigerator overnight before serving to preserve the texture.
Reheating
This cheesecake is best enjoyed chilled, so reheating isn't necessary. If you want to soften it slightly, let slices sit at room temperature for 10–15 minutes before serving.
Frequently Asked Questions:
Absolutely! High-quality store-bought pistachio cream works great and saves time. Just adjust the amount within the ½ to ⅔ cup range to your taste and consistency preferences.
Can I make this recipe gluten-free?
Final Thoughts
There’s something truly special about this No Bake Chocolate Pistachio Cheesecake Recipe — combining the crunchy pistachio knafeh with that rich chocolate filling and cookie crust is a dream come true! It’s a perfect dessert for any occasion, especially when you want to impress without heating up the kitchen. I hope these tips and serving suggestions make your cheesecake journey as smooth and enjoyable as my own. Happy making and even happier indulging!
Print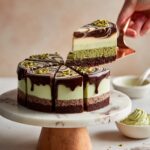
No Bake Chocolate Pistachio Cheesecake Recipe
- Prep Time: 40 minutes
- Chilling Time: 6 hours
- Cook Time: 15 minutes
- Total Time: 6 hours 55 minutes
- Yield: 12 servings 1x
- Category: Dessert
- Method: No-Cook
- Cuisine: Dubai
- Diet: Vegetarian
Description
This decadent No Bake Dubai Chocolate Cheesecake features a rich chocolate cookie crust, a crunchy pistachio knafeh layer, and a creamy chocolate cheesecake filling topped with luscious pistachio cream. Perfect for those craving a luxurious dessert without baking.
Ingredients
Chocolate Cookie Crust
- 25 chocolate creme cookies (e.g., Oreos) (285g)
- 5 tbsp unsalted butter, melted (70g)
Pistachio Knafeh Layer
- 3 cups shredded kataifi (100g)
- 4 tbsp unsalted butter (56g)
- ½ cup to ⅔ cup pistachio cream (140g to 185g)
- Pinch of salt
Chocolate Cheesecake Filling
- 1 cup heavy cream (240g)
- 200g dark or semi sweet chocolate
- 24oz cream cheese (680g), room temperature
- ½ cup granulated sugar (100g)
- 1 tsp vanilla extract
- ½ tsp salt
- ½ cup to ⅔ cup pistachio cream (140g to 185g)
- 1 cup heavy whipping cream, chilled (240g)
Instructions
- Prepare the Chocolate Cookie Crust: Crush the chocolate creme cookies into fine crumbs using a food processor or by placing them in a plastic bag and crushing with a rolling pin. Mix the crumbs with 5 tablespoons of melted unsalted butter until fully combined. Press the mixture firmly into the bottom of a springform pan to form an even crust. Chill in the refrigerator to set.
- Make the Pistachio Knafeh Layer: In a skillet, melt 4 tablespoons of unsalted butter and add the shredded kataifi. Sauté the kataifi in the butter until golden and crispy, stirring frequently to prevent burning. Remove from heat and allow it to cool slightly. Mix in a pinch of salt and ½ cup to ⅔ cup pistachio cream until evenly coated. Spread this pistachio knafeh mixture evenly over the chilled cookie crust. Return to the refrigerator to chill while preparing the filling.
- Prepare the Chocolate for the Filling: Chop the dark or semi-sweet chocolate into small pieces and melt it gently using a double boiler or microwave in short bursts, stirring until smooth. Set aside to cool slightly, but not harden.
- Make the Cheesecake Filling: In a large mixing bowl, beat the room temperature cream cheese with granulated sugar, vanilla extract, and salt until smooth and creamy. In a separate bowl, whip 1 cup of heavy cream to soft peaks. Fold the whipped cream into the cream cheese mixture gently to maintain fluffiness. Gradually add the melted chocolate and fold until evenly incorporated.
- Add the Pistachio Cream: Stir in ½ cup to ⅔ cup pistachio cream into the chocolate cheesecake mixture to infuse it with pistachio flavor.
- Whip the Heavy Whipping Cream: In a clean cold bowl, whip 1 cup of chilled heavy whipping cream to stiff peaks. Gently fold this whipped cream into the cheesecake mixture to create a light, fluffy texture.
- Assemble the Cheesecake: Pour the creamy chocolate pistachio cheesecake filling over the pistachio knafeh layer in the springform pan. Smooth the top with a spatula. Cover and refrigerate for at least 6 hours or overnight, allowing it to set completely.
- Serve: Before slicing, run a warm knife around the edges to loosen the cheesecake from the pan. Slice and serve chilled. Optionally, garnish with extra pistachios or chocolate shavings for presentation.
Notes
- This cheesecake requires no baking, making it ideal for warm climates or quick dessert preparation.
- For the best flavor, use high-quality dark or semi-sweet chocolate and fresh pistachio cream.
- Shredded kataifi must be crisped properly to achieve the signature crunchy layer; watch closely to avoid burning.
- You can substitute pistachio cream with finely ground pistachios mixed with a little honey or syrup if unavailable.
- Ensure the cream cheese is at room temperature before mixing to avoid lumps.
- Chilling the assembled cake overnight improves texture and flavor melding.
Nutrition
- Serving Size: 1 slice (about 100g)
- Calories: 420 kcal
- Sugar: 25 g
- Sodium: 180 mg
- Fat: 32 g
- Saturated Fat: 18 g
- Unsaturated Fat: 12 g
- Trans Fat: 0 g
- Carbohydrates: 28 g
- Fiber: 2 g
- Protein: 6 g
- Cholesterol: 85 mg


Leave a Reply