Looking for a sweet treat that’s both creamy and crunchy without heating up the kitchen? This Creamy Butterfinger Peanut Butter Balls Recipe is a total game changer—rich peanut butter, buttery graham cracker crumbs, and those irresistible crushed Butterfinger bars all coated in smooth chocolate. Let me show you how easy and delicious these no-bake delights are!

Jump to:
- Why You'll Love This Recipe
- Ingredients & Why They Work
- Make It Your Way
- Step-by-Step: How I Make Creamy Butterfinger Peanut Butter Balls Recipe
- Top Tip
- How to Serve Creamy Butterfinger Peanut Butter Balls Recipe
- Make Ahead and Storage
- Frequently Asked Questions:
- Final Thoughts
- Creamy Butterfinger Peanut Butter Balls Recipe
Why You'll Love This Recipe
I can honestly say these Butterfinger Balls have become my go-to for last-minute holiday gatherings and casual sweet cravings alike. They feel indulgent but come together so quickly—and you don’t even have to turn on the oven!
- Quick & Easy: No baking required, so you’re done in under an hour from start to finish.
- Creamy & Crunchy: The perfect contrast from smooth peanut butter to crunchy candy bits and graham cracker crumbs.
- Customizable Coating: Fully or halfway dipped chocolate, plus fun toppings for a festive touch.
- Perfect for Gifting: These hold up well in the freezer and make great make-ahead party treats.
Ingredients & Why They Work
Before you dive in, make sure you grab peanut butter that’s creamy and stable—I steer clear of natural types that separate since texture is key here. Also, crushed Butterfinger bars are the star crunch, so don’t skimp on quality candy bars!

- Butter: Softened for easy mixing, it adds moisture and richness that smooths out the peanut butter.
- Vanilla Extract: A little warmth and depth of flavor that balances the sweetness.
- Peanut Butter: Use regular creamy peanut butter like Jif or Skippy to keep the texture just right.
- Powdered Sugar: Adds sweetness and helps bind everything together without graininess.
- Graham Cracker Crumbs: Provide a subtle crunch and wonderful buttery flavor.
- Crushed Butterfinger Bars: The candy crunch magic that makes these balls unique and irresistibly tasty.
- Chocolate Bark or Chips: For coating—smooth and silky, they give the perfect final touch.
- Optional Toppings: Extra crushed Butterfinger, festive sprinkles, or coarse sea salt to add color, texture, and flavor contrast.
Make It Your Way
One of the best things about this Creamy Butterfinger Peanut Butter Balls Recipe is how easy it is to customize. Whether you want to tweak the chocolate coating or add a personal twist to the toppings, these sweet treats adapt beautifully to your taste and occasion.
- Chocolate Swap: I love using dark chocolate chips for a richer, more intense flavor that pairs perfectly with the sweet peanut butter and crunchy Butterfinger bits.
- Festive Flare: During the holidays, I sprinkle on colorful festive sprinkles or coarse sea salt to add both visual appeal and a delightful contrast of flavors.
- No-Bake Diet-Friendly: For those needing gluten-free options, simply swap the graham cracker crumbs for gluten-free cookie crumbs—you won’t even notice the difference!
- Partial Dipper: Sometimes, dipping the balls only halfway into the chocolate and leaving the peanut butter base visible creates a fun two-tone effect that's as pretty as it is delicious.
Step-by-Step: How I Make Creamy Butterfinger Peanut Butter Balls Recipe

Step 1: Cream Together the Base Ingredients
Start by softening your butter to room temperature for effortless mixing. In a large bowl, use a hand or stand mixer to blend the peanut butter and softened butter until silky smooth. The creamy texture here is essential for that melt-in-your-mouth experience. Next, add the vanilla extract and mix just until combined—this little touch enhances the flavor beautifully.
Step 2: Add Sweetness and Crunch
Gradually add the powdered sugar at low speed, which prevents a cloud of sugar from flying everywhere. Scrape down the sides of your bowl to keep everything well incorporated. Now, gently fold in the graham cracker crumbs and crushed Butterfinger bars. The mixture should feel thick but pliable, with that perfect crunch peeking through every bite.
Step 3: Form the Peanut Butter Balls
Line a baking sheet with parchment paper for easy cleanup. Using a cookie scoop or spoon, scoop out about 1 to 1½ tablespoons of the mixture each time, then roll it gently between your palms into smooth balls. Space them apart on the sheet to keep them from sticking together.
Step 4: Chill Until Firm
Pop the baking sheet into the freezer for 30 minutes. This step firms up the balls so they hold their shape during the chocolate dipping—and trust me, it makes the coating process way easier and less messy.
Step 5: Melt the Chocolate
Place the chocolate bark or chips in a microwave-safe bowl and heat in 30-second bursts at 50% power. Stir between intervals to encourage even melting and prevent scorching. The ideal consistency is smooth, glossy chocolate that drapes easily over the peanut butter balls.
Step 6: Dip and Decorate
Working quickly, dip each firm ball into the melted chocolate—fully coated or just halfway, whatever you prefer! Before the chocolate sets, sprinkle on extra crushed Butterfinger bits, sea salt, or festive sprinkles to amp up texture and flavor.
Step 7: Let Them Set and Enjoy
Allow the chocolate to harden completely at room temperature, or for quicker results, place the dipped balls back in the freezer for a few minutes. Once set, your Creamy Butterfinger Peanut Butter Balls are ready to impress at any party or just satisfy your sweet tooth at home.
Top Tip
Making these Creamy Butterfinger Peanut Butter Balls Recipe come out just right is all about a few simple tricks that ensure perfect texture and appearance every time.
- Peanut Butter Choice: Always use a classic creamy peanut butter like Jif or Skippy—not natural varieties that separate—to get that smooth, consistent base without any watery texture.
- Chilling is Key: Don’t skip the chilling step before dipping. Freezing the balls for 30 minutes makes them firm, so the chocolate coating sets nicely without smudging or sliding off.
- Chocolate Melting: Melt chocolate slowly at 50% power in short bursts and stir frequently. This keeps it smooth and shiny without burning, which can easily happen if overheated.
- Decoration Timing: Add your toppings like crushed Butterfinger bars, sprinkles, or a pinch of sea salt immediately after dipping, while the chocolate is still soft. That way, they stick perfectly!
How to Serve Creamy Butterfinger Peanut Butter Balls Recipe

Garnishes
These Peanut Butter Balls are already packed with flavor, but a few thoughtful garnishes can elevate them even more. Sprinkle extra crushed Butterfinger bar pieces on top for added crunch, a light dusting of festive sprinkles for holiday cheer, or a delicate sprinkle of coarse sea salt to contrast the sweetness — each adds a fun and tasty touch.
Side Dishes
Serve these treats alongside a cold glass of milk, creamy hot cocoa, or your favorite coffee for the perfect balance. They’re also a great sweet finish to a casual dessert platter featuring fresh fruit or simple cookies.
Make Ahead and Storage
Storing Leftovers
Keep your Creamy Butterfinger Peanut Butter Balls fresh by storing them in an airtight container in the refrigerator. They will stay delicious and firm for up to one week—perfect for enjoying over several days.
Freezing
These no-bake treats freeze beautifully! Place them in a single layer on a baking sheet to freeze solid, then transfer to a freezer-safe container or zip-top bag. They’ll keep for up to 3 months. When ready to enjoy, just thaw in the fridge for a few hours.
Reheating
No reheating is necessary or recommended — these balls are best served chilled or at room temperature to preserve their creamy texture and crisp chocolate coating.
Frequently Asked Questions:
It’s best to avoid natural peanut butters that separate because the oil can make the mixture too loose and affect the texture of the balls. Use a creamy, classic peanut butter like Jif or Skippy for the best results.
You can use chocolate bark or chocolate chips. For a richer, deeper flavor, dark chocolate is a great choice, but milk chocolate also works beautifully to complement the peanut butter and Butterfinger flavors.
When stored in an airtight container in the refrigerator, they last up to 1 week. For longer storage, freeze them for up to 3 months.
Absolutely! These freeze very well, so you can prepare them in advance and thaw them before serving. They’re perfect for busy holiday schedules.
Final Thoughts
Whether you’re whipping up a last-minute dessert or preparing treats ahead for a festive gathering, this Creamy Butterfinger Peanut Butter Balls Recipe is a sure crowd-pleaser. The combination of creamy, crunchy, sweet, and salty hits all the right notes every single time. Thanks for cooking along with me — I hope this recipe brings as much joy to your kitchen as it has to mine!
Print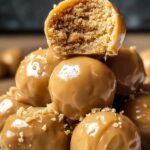
Creamy Butterfinger Peanut Butter Balls Recipe
- Prep Time: 20 minutes
- Cook Time: 30 minutes
- Total Time: 50 minutes
- Yield: 24 balls 1x
- Category: Dessert
- Method: No-Cook
- Cuisine: American
Description
Butterfinger Balls are a quick and easy no-bake treat combining creamy peanut butter, crunchy graham cracker crumbs, and crushed Butterfinger bars, all coated in smooth chocolate. Perfect for holiday parties or anytime you want a sweet, crunchy delight.
Ingredients
Base Ingredients
- 4 tablespoons butter softened
- 1 teaspoon vanilla extract
- 1 cup peanut butter (avoid all-natural varieties that separate)
- 1 cup powdered sugar
- ¾ cup graham cracker crumbs
- ½ cup crushed Butterfinger bars
Coating and Toppings
- 8 ounces chocolate bark or chocolate chips for coating
- Optional: extra crushed Butterfinger bars for topping
- Optional: festive sprinkles for topping
- Optional: coarse sea salt for topping
Instructions
- Mix the Base: In a large bowl, use a hand or stand mixer to cream together the peanut butter and softened butter until smooth. Add vanilla extract and mix until combined.
- Add Sweetness and Crunch: Gradually mix in the powdered sugar at low speed, scraping the sides of the bowl as needed. Fold in graham cracker crumbs and crushed Butterfingers until the mixture is evenly combined.
- Form the Balls: Line a baking sheet with parchment paper. Scoop about 1 to 1½ tablespoons of the dough and roll into balls. Place them spaced apart on the sheet.
- Chill to Set: Freeze the formed balls for 30 minutes or until completely firm.
- Melt the Chocolate: In a microwave-safe bowl, melt the chocolate bark or chips in 30-second intervals at 50% power, stirring between bursts until smooth. Be careful not to overheat.
- Dip and Decorate: Dip each chilled ball in the melted chocolate—either fully or halfway. Immediately top with additional crushed Butterfingers, sea salt, or sprinkles before the chocolate sets.
- Let Them Set: Allow the chocolate coating to harden completely before serving or storing.
Notes
- Use regular peanut butter (like Jif or Skippy) for best consistency and flavor.
- For a deeper chocolate flavor, use dark chocolate chips or bark instead of milk chocolate.
- These freeze beautifully—great for make-ahead treats during holidays or special occasions.
- Try dipping only halfway for a two-tone look or drizzle extra chocolate over the tops once set.
Nutrition
- Serving Size: 1 ball
- Calories: 140 kcal
- Sugar: 12 g
- Sodium: 55 mg
- Fat: 9 g
- Saturated Fat: 4 g
- Unsaturated Fat: 4 g
- Trans Fat: 0 g
- Carbohydrates: 12 g
- Fiber: 1 g
- Protein: 3 g
- Cholesterol: 15 mg


Leave a Reply